
記事文章
はじめに
WordPressを使ってブログを運営していると、毎回アイキャッチ画像を設定するのが手間ですよね!
今回は、アイキャッチ画像を自動で生成するプラグインの作り方をご紹介します。これで作業が楽になります。
プラグインを作成する理由
「なぜアイキャッチ画像を自動生成したいの?」と思うかもしれません。
手動で設定するのは時間がかかるし、記事ごとに統一感がなくなってしまうこともあります。
自動生成することで、時間を節約し、一貫したビジュアルスタイルを維持することを目的としています。
まずは準備から
最初に、WordPressの管理画面にログインし、プラグインのディレクトリを作成します。wp-content/pluginsフォルダに移動し、新しいフォルダを作成して、例えば「my-featured-image-plugin」と名前を付けましょう。
プラグインの基本コード
新しいフォルダを作成したら、その中に「my-featured-image-plugin.php」というファイルを作成します。ここにプラグインの基本コードを書き込みます。
作ったコードはフォルダことzip化してWordPressのプラグインからアップロードしてインストールするのも良いでしょう。
<?php
/*
Plugin Name: My Featured Image Plugin
Description: Generate featured images with custom text overlays from media library.
Version: 1.2
Author: Your Name
*/

// Enqueue scripts and styles
function my_featured_image_plugin_enqueue_scripts($hook) {
    if ($hook != 'toplevel_page_featured-image-generator' && $hook != 'post.php' && $hook != 'post-new.php') {
        return;
    }
    wp_enqueue_media();
    wp_enqueue_script('my-featured-image-plugin-script', plugins_url('/js/featured-image.js', __FILE__), array('jquery'), null, true);
    wp_localize_script('my-featured-image-plugin-script', 'myPluginAjax', array('ajax_url' => admin_url('admin-ajax.php')));
}

add_action('admin_enqueue_scripts', 'my_featured_image_plugin_enqueue_scripts');

// Add admin page
function my_featured_image_plugin_add_admin_page() {
    add_menu_page('Featured Image Generator', 'Featured Image', 'manage_options', 'featured-image-generator', 'my_featured_image_plugin_create_page', 'dashicons-format-image', 110);
}

add_action('admin_menu', 'my_featured_image_plugin_add_admin_page');

// Create admin page
function my_featured_image_plugin_create_page() {
    ?>
    <div class="wrap">
        <h1>Generate Featured Image</h1>
        <button id="select-image" class="button button-primary">Select Background Image</button>
        <br><br>
        <textarea id="title-text" placeholder="Enter title text" style="width: 100%; padding: 10px; font-size: 16px; height: 100px;"></textarea>
        <br><br>
        <button id="generate-featured-image" class="button button-primary">Generate Image</button>
        <br><br>
        <img id="generated-image" src="" alt="Generated Image" style="max-width: 100%; height: auto; display: none;">
        <br><br>
        <button id="save-image" class="button button-primary" style="display: none;">Save to Media Library</button>
    </div>
    <?php
}

// Save image via AJAX
function my_featured_image_plugin_save_image() {
    if (!current_user_can('upload_files')) {
        wp_send_json_error('You do not have permission to upload files.');
        return;
    }

    $img = $_POST['image'];
    $img = str_replace('data:image/png;base64,', '', $img);
    $img = str_replace(' ', '+', $img);
    $data = base64_decode($img);

    $upload_dir = wp_upload_dir();
    $upload_path = $upload_dir['path'] . '/' . uniqid() . '.png';
    $file_saved = file_put_contents($upload_path, $data);

    if ($file_saved) {
        $filetype = wp_check_filetype(basename($upload_path), null);
        $attachment = array(
            'post_mime_type' => $filetype['type'],
            'post_title' => sanitize_file_name(basename($upload_path)),
            'post_content' => '',
            'post_status' => 'inherit'
        );

        $attach_id = wp_insert_attachment($attachment, $upload_path);
        require_once(ABSPATH . 'wp-admin/includes/image.php');
        $attach_data = wp_generate_attachment_metadata($attach_id, $upload_path);
        wp_update_attachment_metadata($attach_id, $attach_data);

        if (isset($_POST['post_id'])) {
            set_post_thumbnail($_POST['post_id'], $attach_id);
        }

        wp_send_json_success('Image saved successfully and set as featured image.');
    } else {
        wp_send_json_error('Image saving failed.');
    }
}

add_action('wp_ajax_save_image', 'my_featured_image_plugin_save_image');

// Add meta box to post editor
function my_featured_image_plugin_add_meta_box() {
    add_meta_box(
        'my_featured_image_generator',
        'Generate Featured Image',
        'my_featured_image_plugin_meta_box_callback',
        'post',
        'side'
    );
}

add_action('add_meta_boxes', 'my_featured_image_plugin_add_meta_box');

function my_featured_image_plugin_meta_box_callback($post) {
    ?>
    <button id="select-image" class="button button-primary">Select Background Image</button>
    <br><br>
    <textarea id="title-text" placeholder="Enter title text" style="width: 100%; padding: 10px; font-size: 16px; height: 100px;"><?php echo esc_html($post->post_title); ?></textarea>
    <br><br>
    <button id="generate-featured-image" class="button button-primary">Generate Image</button>
    <br><br>
    <img id="generated-image" src="" alt="Generated Image" style="max-width: 100%; height: auto; display: none;">
    <br><br>
    <button id="save-image" class="button button-primary" style="display: none;" data-post-id="<?php echo $post->ID; ?>">Save to Media Library</button>
    <?php
}
?>
次に「my-featured-image-plugin」のフォルダの中に以下のjsファイルを作ります。
jQuery(document).ready(function($) {
    var mediaUploader;

    $('#select-image').on('click', function(e) {
        e.preventDefault();
        if (mediaUploader) {
            mediaUploader.open();
            return;
        }
        mediaUploader = wp.media({
            title: 'Select Background Image',
            button: {
                text: 'Use this image'
            },
            multiple: false
        });

        mediaUploader.on('select', function() {
            var attachment = mediaUploader.state().get('selection').first().toJSON();
            $('#select-image').data('image-url', attachment.url);
        });

        mediaUploader.open();
    });

    $('#generate-featured-image').on('click', function() {
        var selectedImage = $('#select-image').data('image-url');
        var titleText = $('#title-text').val();

        if (!selectedImage) {
            alert('Please select a background image.');
            return;
        }

        var canvas = document.createElement('canvas');
        var context = canvas.getContext('2d');

        var img = new Image();
        img.src = selectedImage;
        img.onload = function() {
            canvas.width = img.width;
            canvas.height = img.height;

            context.drawImage(img, 0, 0);
            context.globalAlpha = 0.5;
            context.fillStyle = '#000';
            context.fillRect(0, 0, canvas.width, canvas.height);

            context.globalAlpha = 1.0;
            context.fillStyle = '#fff';
            context.textAlign = 'center';
            wrapText(context, titleText, canvas.width / 2, canvas.height / 2, canvas.width - 40, 48); // Adjusted line height to 48

            var generatedImage = canvas.toDataURL('image/png');
            $('#generated-image').attr('src', generatedImage).show();
            $('#save-image').show().data('image', generatedImage);
        };
    });

    $('#save-image').on('click', function() {
        var image = $(this).data('image');
        var postId = $(this).data('post-id');
        $.ajax({
            type: 'POST',
            url: myPluginAjax.ajax_url,
            data: {
                action: 'save_image',
                image: image,
                post_id: postId
            },
            success: function(response) {
                if (response.success) {
                    alert('Image saved successfully and set as featured image.');
                } else {
                    alert('Image saving failed.');
                }
            }
        });
    });

    function wrapText(context, text, x, y, maxWidth, lineHeight) {
        var lines = text.split('\n');
        var fontSize = 40;
        var adjustedLineHeight = lineHeight * 1.2; // Adjust line height by 1.2 times

        // Calculate the initial font size
        context.font = fontSize + 'px Arial';

        // Adjust font size if necessary
        var isTooWide = false;
        do {
            isTooWide = false;
            context.font = fontSize + 'px Arial';
            for (var i = 0; i < lines.length; i++) {
                var testWidth = context.measureText(lines[i]).width;
                if (testWidth > maxWidth) {
                    isTooWide = true;
                    fontSize--;
                    break;
                }
            }
        } while (isTooWide && fontSize > 10);

        // Draw text lines with adjusted line height
        for (var i = 0; i < lines.length; i++) {
            context.fillText(lines[i], x, y + (i * adjustedLineHeight) - ((lines.length - 1) * adjustedLineHeight / 2));
        }
    }
});
上記で作成したコードはGitHub上でも公開しています。
https://github.com/acre-jel/my-featured-image-plugin
コードの説明
上記のコードは以下の機能を実装しています。
アイキャッチに使用する背景画像を選択。好きな背景画像を記事ごとに設定できます!
選択した画像を50%暗くします。これにより文字を目立たせることができます!
背景画像の上にテキストを追加
投稿画面から開いた場合はタイトルが自動入力されます!
テキストサイズを画像サイズに合わせて自動縮小します!
生成した画像をメディアライブラリに保存
投稿画面から開いた場合はアイキャッチとしても設定されます!
プラグインの有効化
WordPressの管理画面に戻り、「プラグイン」セクションで「my-featured-image-plugin」を有効化します。これで完了です!
使用感
投稿画面のサイドバーから背景画像と文字を入力すればアイキャッチ画像を自動生成できます!
PhotoShopなどの画像編集ソフトを立ち上げて編集するよりは格段に楽をすることができます!
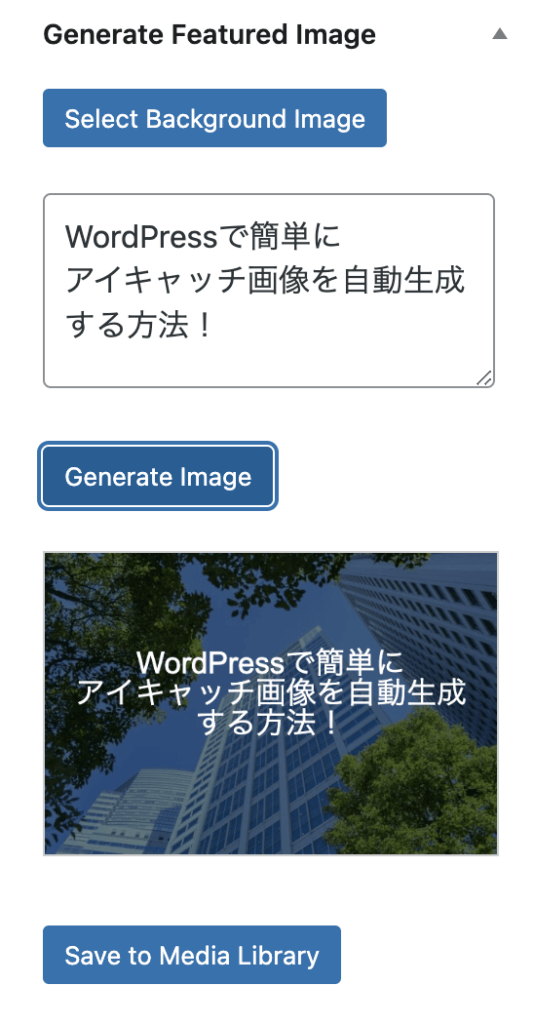
生成結果

まとめ
今回のプラグインで、毎回のアイキャッチ画像設定の手間がかなり削減できました。ぜひ試してみてください!